
I'm proud to announce that I am a new Design Team Member for the Creative Craft Cottage Challenge blog. Even though the majority of the Design Team is from New Zealand, several of the additions to the Team are from the US. I'm excited to be a part of this fairly new blog and meet some new creative friends.
The challenge for this week is "Anything Goes!"
I have joined a new-to-me swap group on Facebook, Creative Swappers. There are up to 10 swaps to choose from every month. You are sure to find something that appeals to you! My first swap is the "Blue & Silver Color Swap." When the swap is completed, I will have enough items to make a couple of cards or maybe even a scrapbook page. I can't wait to see what I get! Maybe it will snow this year and I'll get to make a snow page. I haven't made one of those since 2010!
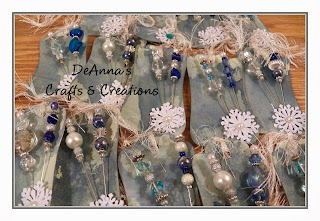
I signed up to make Stick Pins. I'm proud of myself...I shopped entirely from my stash for this project. They only thing it's going to cost me is postage. Nice!
I used my Silhouette Cameo to cut the tag shape. The size is approximately 3"x4". I used my favorite coloring technique (Tim's Wrinkle Free Distress) using Picket Fence Distress Paint and Broken China Distress Ink (or maybe it was Stormy Sky...I can't remember!). I used foam dots to attach 2 snowflakes (Martha Stewart punch) to the corner. I used the foam dots to adhere my stick pins to the tag. A flat back pearl on the snowflake and some "fun-fur" finish the tag.

 There is a new challenge every 2 weeks over at The Creative Craft Cottage. I'll hope you'll join us!

The challenge for this week is "Anything Goes!"
I have joined a new-to-me swap group on Facebook, Creative Swappers. There are up to 10 swaps to choose from every month. You are sure to find something that appeals to you! My first swap is the "Blue & Silver Color Swap." When the swap is completed, I will have enough items to make a couple of cards or maybe even a scrapbook page. I can't wait to see what I get! Maybe it will snow this year and I'll get to make a snow page. I haven't made one of those since 2010!
I signed up to make Stick Pins. I'm proud of myself...I shopped entirely from my stash for this project. They only thing it's going to cost me is postage. Nice!
I used my Silhouette Cameo to cut the tag shape. The size is approximately 3"x4". I used my favorite coloring technique (Tim's Wrinkle Free Distress) using Picket Fence Distress Paint and Broken China Distress Ink (or maybe it was Stormy Sky...I can't remember!). I used foam dots to attach 2 snowflakes (Martha Stewart punch) to the corner. I used the foam dots to adhere my stick pins to the tag. A flat back pearl on the snowflake and some "fun-fur" finish the tag.


Hi! I love your tags! I was wondering how you made your stick pins and the supplies you used. They are beautiful and perfect for your tags!
ReplyDeleteThanks so much,
Sue Brailey
I use the 3" corsage pins from JoAnn's...haven't been able to find them anywhere else. For glue I use Glossy Accents. I buy beads and metal spacers from Hobby Lobby, usually. They tend to have the best prices. Just put your beads on, glue between each bead, then hang upside down to dry. I put mine in a piece of Styrofoam that sits on top of a cup.
DeleteThank you so much!! Sounds like even I can do it! Sorry I just saw this. Thanks again for your help and sharing your talent! And congrats on the design team!
DeleteSue Brailey
Love it!!!!. You are very talented.
DeleteThanks Lynda!
DeleteDo you have wedding ideas or can you design wedding invitations. Crystal is getting married next year and Id love ideas for her. Also a wedding scrap book would be nice.
ReplyDeleteCongrats on another awesome project!!! (now I'm researching wrinkle free distress stain..... :) )
ReplyDeleteThanks!
DeleteWrinkle free distress is just a technique...you can use any Distress products to do it! It's one of my very favorite techniques. I use it a LOT!
Congratulations on making another design team! You are a great asset to the LWD Design Team, so I know you will be one to theirs, too!
ReplyDeleteThank you!
Delete