Tuesday, October 15, 2013

Creative Craft Cottage Challenge: Anything Goes!

I'm proud to announce that I am a new Design Team Member for the Creative Craft Cottage Challenge blog. Even though the majority of the Design Team is from New Zealand, several of the additions to the Team are from the US. I'm excited to be a part of this fairly new blog and meet some new creative friends.

The challenge for this week is "Anything Goes!"

I have joined a new-to-me swap group on Facebook, Creative Swappers. There are up to 10 swaps to choose from every month. You are sure to find something that appeals to you! My first swap is the "Blue & Silver Color Swap." When the swap is completed, I will have enough items to make a couple of cards or maybe even a scrapbook page. I can't wait to see what I get! Maybe it will snow this year and I'll get to make a snow page. I haven't made one of those since 2010!

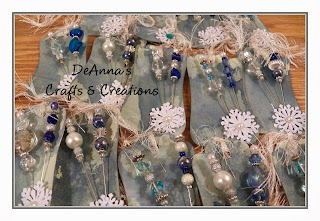
I signed up to make Stick Pins. I'm proud of myself...I shopped entirely from my stash for this project. They only thing it's going to cost me is postage. Nice!

I used my Silhouette Cameo to cut the tag shape. The size is approximately 3"x4". I used my favorite coloring technique (Tim's Wrinkle Free Distress) using Picket Fence Distress Paint and Broken China Distress Ink (or maybe it was Stormy Sky...I can't remember!). I used foam dots to attach 2 snowflakes (Martha Stewart punch) to the corner. I used the foam dots to adhere my stick pins to the tag. A flat back pearl on the snowflake and some "fun-fur" finish the tag.


There is a new challenge every 2 weeks over at The Creative Craft Cottage. I'll hope you'll join us!

Friday, October 11, 2013

Lone Wolf Designs Design Team Showcase: Graphic 45 Steampunk Spells

It's my turn again for the Lone Wolf Designs Design Team and I'm back with a Halloween home decor project. This week I am showcasing the Steampunk Spells Collection by Graphic 45. The product description from Product Performers says it best: "Steampunk Spells celebrates the dark side of the Halloween season! This fanciful collection is bursting with bright and complimentary colors of cerulean blue, antiqued ivory, hues of rust and orange, all against a black autumn sky. Let us take you on a vintage voyage filled with mechanical marvels, florals, and glorious gears. Filled with images of moonlit owls, hot air balloons mid-flight, and cobwebbed clocks that Tick-Tock, this collection will make Halloween an event to celebrate the year through!"

Remember to be mindful of an open flame around paper...You don't want to burn the place down!!!

The pumpkin banner is a shape that I purchased from the Silhouette store. I sized it to just under 6” and cut 5 pumpkins with various pieces of paper from the 12x12 paper pad. I created an offset (shadow) and cut that out of black Bazill cardstock. I used a piece of solid brown paper from the 6x6 pad to cut the stem. I inked the edges of the pumpkins and stems with Distress Ink (Black Soot and Gathered Twigs). 


I have closeups of the completed banner towards the end of the post. Right now, I want to show you the other pieces of the tablescape. I went through my house and gathered a few candles and candle holders that would match the paper collection. I picked up those grapevine pumpkins on clearance at Cracker Barrel many years ago. They are one of my favorite fall decorations. I love that G45 has started making coordinating embellishments.  They add a great finishing touch to your project. I used chipboard tags, banners, and flowers to add to the items I found. I used Black Soot Distress Ink on all the edges.


Because Love Potion No. 45 is WAY better than Love Potion No. 9!

This 3D pumpkin is a cut file from the Silhouette store. I cut it at 3” and inked all the edges with Black Soot Distress Ink. After I glued it together, I accented the pumpkin with a chipboard tag and a black ribbon bow.


My cake plate usually holds a large 3-wick candle. I don’t think it’s ever had a cake on it! For this project, though, I decided to dress it up with a few banner pieces, a large grapevine pumpkin, and a fall flower pick.


Now for the star of the show...the Pumpkin Banner...

I accented the first pumpkin with a tag, stickers, and a paper flower. I also added a few Petaloo feathers (colored with Antique Linen Distress Ink), a stick pin from my stash, and a chipboard tag. I used Crackle Accents on the clock. It’s kind of hard to tell from the picture, but using the Crackle Accents creates a great “spider web” cracked glass effect on the face of the clock. LOVE it! 


The second pumpkin has Glossy Accents on one of the hot air balloons (on the right side) and on the bats.  I attached the black envelope with SU Dimensionals and layered paper and chipboard tags behind it. I added Crackle Accents to the skull and crossbones chipboard piece. 


I love the clock and gear paper used for the third pumpkin.  I cut the middle of the pumpkin to get the “double, double, toil and trouble” phrase and then accented it with Crackle Accents. I used some twine, charms, and a few of the small banner pieces to create a banner to go across the bottom of the pumpkin.  I also used Crackle Accents on the banner pieces. 


I think the fourth pumpkin is my favorite. I love the colors! I used a chipboard tag and stickers from the collection to accent this pumpkin. I used Crackle Accents on the butterfly.


The final pumpkin has a tag, flower, and chipboard tag from the collection. I used my Silhouette to cut the flourishes to use as leaves for the flower


Here's a look at the finished tablescape one more time. Even though Halloween is not my thing, I really enjoyed using this paper line. I love Graphic 45 paper and the extra goodies they make to go with them (tags, flowers, banners). 


As a reward for wading through ALL those pictures, I’m giving away the Pumpkin Banner that I made, a set of Steampunk Spells Cardstock Stickers and a set of the Banners. To be entered to win, you must be a follower of my blog AND the Lone Wolf Designs blog. Leave a comment here on my blog letting me know your favorite part of the Steampunk Spells Collection~My favorite part is the colors. Don’t forget to include your email address so I can contact you if you are the winner! (Entries without an email address will not count.) Contest closes Midnight, Wednesday, October 16, 2013 and the winner will be announced on the LWD blog on Friday, October 18, 2013 along with another great project by another member of the LWD Design Team. Make sure you check it out to see if you are the winner!

You can find these and many more products for your crafting projects at 25% off MSRP at Lone Wolf Designs, LLC. All you have to do is join the Lone Wolf Designs Discount Craft Supplies Facebook group. If you haven’t joined us yet, you’re paying TOO MUCH for your craft supplies!

Supplies (LWD product number listed in parentheses): 

Graphic 45 Steampunk Spells
12x12 paper pad (GR4500692)
6x6 paper pad (GR4500694)
Alphabet stickers (GR4500699)
Cardstock stickers (GR4500698)
Banners (GR4500695)
Flowers (GR4500696)
Tags & Pockets (GR4500697)
Chipboard 1 (GR4500700)
Chipboard 2 (GR4500701)
Distress Ink
Black Soot (THTIM19541)
Gathered Twigs (THTIM32823)
Antique Linen (THTIM19497)
Inkssentials Crackle Accents (DPCAC21926)
Inkssentials Glossy Accents (DPGAC17042)
Petaloo Feathers-Cream (PL1608001D)

Other:
Bazill Cardstock-Black Tie
Recollections Brads-Silver (colored black with a Sharpie)
Stampin Up! Dimensionals

Misc from my stash:
Brads
Twine
Stick pin (from a swap)
Charms


Wednesday, October 2, 2013

Thankful Card

This card is for the October Card Swap in the Luv2Swap Facebook Group. The theme is Thanksgiving. I was inspired by this card and this card. I combined the ideas of both of them to get my card.


This is a standard A2 size card. The sentiment is from the Silhouette store and I just printed it out and used some of the paper scraps to mat it. The leaves are attached with a pop-dot and anchored under the button which is threaded with hemp twine and attached to the card front with Beacon 3-in-1.


Supplies:
Distress Inks: Fired Brick, Forest Moss, Ripe Persimmon, Vintage Photo
Die: Tim Holtz Alterations Tattered Leaves
Paper: BasicGrey Fact & Fiction


Monday, September 9, 2013

An "Any Occasion" Card

I'm working my way through this Basic Grey paper pad...My husband thinks my card looks like a Christmas card, so I guess it's going to go in my Christmas Card stash for this year. It was not designed as a Christmas card, but I guess the color scheme lends itself to that theme.

This is my inspiration card:


And here is my card:
                                              

I haven't entered my projects into very many challenges this year. I'm going to do better at that for the rest of the year. This card has been entered in Challenge #18 Anything Goes~Creative Cutting Challenge

Shapes: I used my Silhouette to draw and cut the circle. The banner shape is from the Silhouette Store (Design ID #33147). I used my paper trimmer for the rectangles. 

Dies: Tim Holtz Tattered Florals and Sizzlets Little Leaves (SU!)

Paper: Basic Grey Fact & Fiction line

Inks: Tim Holtz Distress Inks in Fired Brick, Forest Moss, Iced Spruce, and Vintage Photo

Misc: Want2Scrap pearls, brad and lace from my stash

Thanks for stopping by!


Sunday, September 8, 2013

More Chalk Art Cards

I have a few more Chalk Art Cards for you today. These cards are made following this tutorial on the Silhouette Blog. The paper and embellishments are from the Basic Grey Fact & Fiction line. The felt flowers are from the dollar bin at Michael's. The label shape and the sentiment are both from the Silhouette Online Store.


Thanks for stopping by!

Thursday, September 5, 2013

Anniversary Card

It's two weeks until my 4th wedding anniversary and I have my card done. I usually wait until the last minute, but not this year! 


Right now, chalkboard art is very "hot" in the crafting world. Today on the Silhouette Blog they showcased a sketch and a card made with a chalk art print and cut. I followed this video tutorial showing how to make the print and cut file for the Silhouette. After I cut the shape I rubbed the cardstock with a piece of chalk then rubbed it off with a paper towel. I made my card according to the sketch. I love all the layers! All the patterned paper is from the Basic Grey Fact & Fiction line. I used the coordinating tape strips and  flag as embellishments. The leaves are from the dollar bin at Michael's and I think the flower is Prima. (It was loose in the flower bin, so I'm not sure.) Since the card is for my husband, I tried not to make it to frilly, but I had to get a flower on there somewhere. 


I love using a paper pad that has coordinating embellishments. All the matching is done for me and I don't have to worry about whether or not the patterns and colors go together.

I really enjoyed this chalkboard technique. I think I'm going to need to make a few more cards with the technique. Have you tried chalkboard art? Leave me a link so I can check it out!


Friday, August 30, 2013

Lone Wolf Design Team Showcase: Ranger Adirondack Alcohol Inks

I decided to take a break from the home decor projects and get a little inky. Those of you who know me personally know that I do NOT like to get my hands dirty. I'm quite possibly the neatest crafter you will ever meet. :) Now, my work space can get a little, um, well...very messy, but my hands...they will be CLEAN!

I haven't had much opportunity to use the Ranger Adirondack Alcohol Inks, so I decided to take the time to try out a few techniques.  Please check out this video by Tim Holtz that demonstrates application techniques for Adirondack Alcohol Inks.


For my first project I used alcohol ink on the plastic packaging from a Sizzix die. 


Colors used: Watermelon, Shell Pink, Wild Plum, Pink Sherbet


Colors used: Meadow, Lettuce, Pesto
 
Tim Holtz Tattered Poinsettia Die


I punched a hole in the middle of all the pieces and attached them together with a decorative brad. I used my heat tool to heat up the plastic and shape it. Be careful, the plastic is hot! It only stays pliable for a few seconds, so you have to work quickly. This type of flower would be great for an altered art project. I'm going to use mine on my December Daily this year.


Next I used colors of blue alcohol ink on foil. I didn't have any foil tape or foil paper, so I just taped regular aluminum foil to a piece of cardstock. I used a Sizzix embossing folder (Snowflakes 2) to add texture to the background.


Colors used: Stonewashed, Slate
Mixative: Snow Cap, Silver
I decided to turn my snowflake panel into a card front. I haven't decided if I'm going to use a sentiment or not. I still have a few months to decide. :)


Next I colored brads and paper clips. 


I placed a few drops of ink in a small plastic bag and dropped a few paper clips in. I rubbed them around to make sure the entire piece was covered in ink.


After the paper clips dried, I tied coordinating ribbon to the top. Now I have custom paper clips that will match the pages in my SMASH*book perfectly!


Colors used: Pesto, Purple Twilight, Pink Sherbet

I also colored some brads. For the red/pink ones, I just rubbed the tops of the brads on the felt after I colored the plastic for the poinsettia. For the white ones, I added some Snow Cap Mixative to a plastic bag and dropped the brads in. The coverage wasn't as good that way, so I would suggest just coloring the tops with the felt pad.


Alcohol inks are a great way to create custom color embellishments! You will always have the right color to match your project.

You can find these and many more products for your crafting projects at 25% off MSRP at Lone Wolf Designs, LLC. All you have to do is join the Lone Wolf Designs Discount Craft Supplies Facebook group. If you haven’t joined us yet, you’re paying TOO MUCH for your craft supplies!